These notes are an amalgam of ones supplied by Tony Gilliam FGE after a talk to the South West branch plus notes from Sue Burne.
All references to analogue cameras have been removed. If you have one and are familiar with using it then you probably do not need these notes.
The 5 Golden Rules
- The main enemies of glass photography are glare and dust. Glare is caused by incorrect lighting. With some shapes of glass, a little glare is inevitable. Try using a polarised filter to get rid of glare. You can also try using photo editing software to diminish the glare but it often diminishes the engraving too. NEVER use flash.
- Dust is almost impossible to remove completely but a good wipe with an anti-static cloth just before photography works wonders…. as does a squirt of Iso-propyl alcohol before wiping. Handle your glass with non-slip cloth gloves once it is clean.
- For clear engraved glass, try using a coloured background instead of the traditional black. This can really “lift” a photo in the eyes of a publisher. Tony Gilliam suggests deep red. The background must be out of focus. (See method 3)
- For coloured glass, the best lighting is sunlight. Most cameras (particularly those in mobile phones) give accurate colours with sunlight. Artificial light makes colours look “wrong” unless your camera has the ability to sense the spectrum of the ambient light and adjust accordingly.
- If your hands are not steady then use a tripod (or any other convenient support) and the delay feature to make sure the camera is absolutely still when the photo is taken.
The 3 Methods of Photography
Method 1 – Sunlight
On a nice bright sunny day either find a west facing window sill in the morning or an east facing sill in the afternoon. You need plenty of light but not direct sunlight. Don’t photograph engravings in a conservatory or room with a glass roof or you get all sorts of reflections and glare.
Coloured glass benefits from having light coming through it. What you need is thick tracing paper which gives a glowing white background but still plenty of light coming through. To make a good background cover the lower part of the window with white paper to the same height as the top of the engraving then tape a big sheet of the tracing paper to the window and let it drape down over the white paper so the background will be seamless. The same method applies to clear glass but this time you use black paper or velvet instead of white paper. You can try other dark colours.
Finally, dress yourself in dark colours, ideally black. This stops the photo from having an image of you in the glass. Take a lot of photos from various angles of the glass and some by standing a little further away with a slight zoom. These often work better because any reflection of you will be much reduced in size. Leave your set up in place in case none of the images worked well and you need to do more.
This is what the setup looks like:
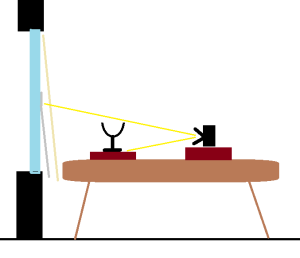
The yellow lines show what the camera can see. The grey line is the white/black paper and the buff line is the tracing paper.
The red blocks are black velvet covered books.
I am text block. Click edit button to change this text. Lorem ipsum dolor sit amet, consectetur adipiscing elit. Ut elit tellus, luctus nec ullamcorper mattis, pulvinar dapibus leo.
Method 2 – The Black Box
This method is best for clear glass because it uses a single “point source” of light. It is the ONLY method that works with stipple engravings. Always use this method in a totally dark room of the house after the sun has gone down in order to ensure that the only light falling on the glass is from the light you are using. Despite this, it still helps to dress in black or use a timer so that you can stand back before the shot is taken.
Buy 5 square sheets of matt-black card and tape them together with matt-black tape to form a box with one side missing. The box only needs to be matt-black on the inside.
Cut a hole in the centre of the top piece of card to match the size of your light. Shine the light down through the hole in the top so that it illuminates the glass. Rob uses a “cool white” LED light to approximate to sunlight. (For stipple you may get better results if the light shines up behind the glass, but that is very difficult to do because the light must not shine at the camera.)
Clean the glass and stand it inside the box on a black velvet covered book (shown as red in the diagram below) to raise it up off the floor of the box.
Position the camera near the opening of the box and zoom in until all you see is the glass not the box. Take a series of photos with the glass directly under the light, then with the glass closer to the front of the box, then closer still. If you can use a dimmable light then try various intensities of light too.
This is what the setup looks like:
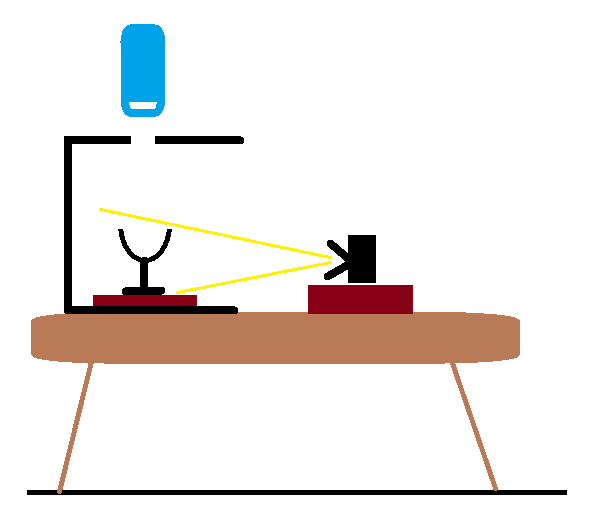
Notice that the camera cannot see the LED light (blue) directly, only the glass.
Method 3 – From Above
If you want an engraved plate, dish or bowl to appear to hover in mid-air, spread the background cloth on the floor. Suspend a large sheet of window glass between two chairs. Put the bowl on top of the sheet and place the camera above it all. If the lighting is right both the window glass and the cloth will be invisible, and the bowl will appear to be suspended by magic.
If you have trouble getting the focus correct, make a black cross on a small piece of white card. Place this on the glass (or get a friend to hold it there) and focus on that. Use a 10-second timer so that he can remove the cross before the camera takes the shot.
This is what the setup looks like:
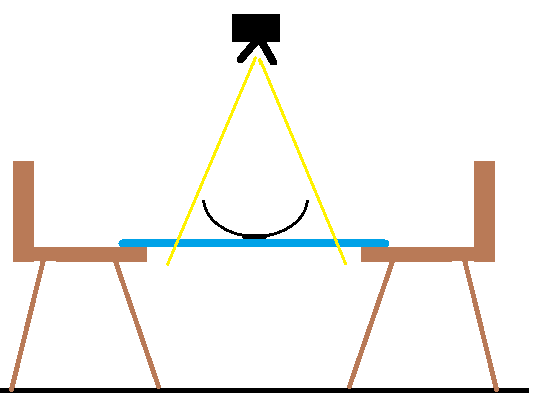
Once again, the yellow lines show what the camera can see.
The chairs stand on the background cloth to hold it flat without wrinkles.
And Finally — Thoughts on Photo Editing software
Once you have taken your photos you may want to adjust the images using a computer. You can spend lots of money on professional editing programs but they are difficult to use and the simpler free ones work tolerably well for the amateur. The important thing to remember is to do small alterations. Don’t over do it. The aim is to make the photo look more like the real thing.
When submitting images to the GGE do not reduce the resolution. The GGE will process your images to best suit our website.
Coloured images often need cropping to get rid of most of the background but may also need a little sharpening or clarifying. Occasionally they need slight brightening or darkening to get the colours to look how you know they are in real life.
Images of clear glass often look better if you turn them into black and white images. This disguises some reflections/glare. You may also need to darken, increase contrast or clarify the image until you get the best effect you can.
Familiarise yourself with the program you use. Sue uses Microsoft Office Picture Manager but has used other programs on previous laptops.